Exporting all the things!
Trying to access the general metadata around your cloud deployment is something that’s incredibly useful when it comes to analyzing your overall cloud footprint. If you’re a Google Cloud user, a lot of this is already simplified as most applications typically export directly to BigQuery. For example, your billing data can be easily exported to BigQuery. Your general logs can be exported to BigQuery. Even your carbon footprint can be exported to BigQuery. When it comes to accessing your deployment assets, the options get pretty interesting. That’s when Steampipe comes into play.
Wait, why wouldn’t I use the Asset Inventory?
Google Cloud Asset Inventory is a viable option for working with your assets. It exposes an API that allows you to export the assets in your project to a BigQuery table, and you can use an orchestration tool of your choice to call the API and create those exports. However, the export format is nested and the data is often buried in JSON snippets stored in STRING objects, when sometimes you just want it in a tabular format.
What makes Steampipe interesting, however, is that it can span multiple cloud tools. Not only can you query against your Google Cloud resources, but you can also join that with AWS deployment data, Github, and other data sources where a plugin has been developed. This is immensely powerful as your cloud footprint grows. This post will focus on connecting Steampipe with Google Cloud resources.
Okay, I’m sold. Let’s do it.
First, let’s get this running on your local machine. This is completely optional, and feel free to skip to the next step if you don’t want to test this locally. Note that the Google Cloud plugin, absent a credentials file, will use your application default authentication. Basically, as long as you’re running it somewhere that you are comfortable logging on as yourself (such as your development machine), just run gcloud auth application-default login and you should be fine.
Next, install Steampipe on your local machine. The process will differ depending on your operating system, but it’s no more than three steps. Once it’s installed and working, run the command steampipe plugin install gcp in order to install the Google Cloud plugin. Enter the query interface by running steampipe query and run select * from gcp_compute_instance. You’ll see something like this:
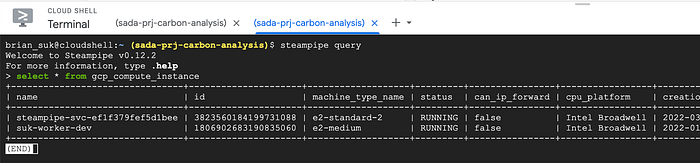
Note, press q to get back to the query prompt, and type .quit to exit. It took me a minute to figure that out as well. But hey, now we see that it works!
Cool, so let’s deploy!
Great! First, let’s go over what is being deployed, and why, before covering the actual set up process. Take a look at the Terraform scripts that we will use to deploy the necessary resources, found in the Github repository. Here are the three main components that we are dealing with:

Here is how the different services are connected:
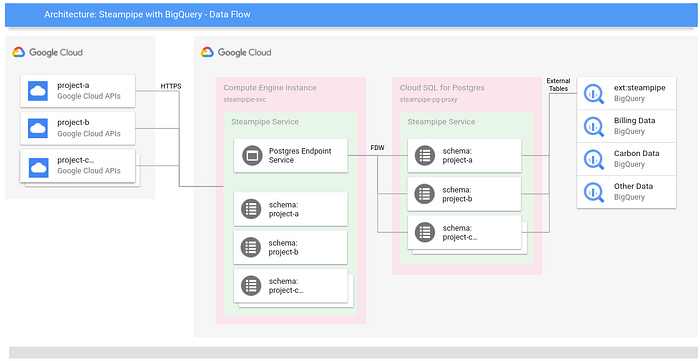
A Service Account with a Custom Role
In order for Steampipe to be able to access the APIs and list the objects needed, we have found that the roles/cloudasset.viewer role covers many of the use cases, and it’s one of the roles that are in the Terraform manifest. Objects related to compute were also outside the Cloud Asset role, so we have added the roles/compute.viewer role as well. As we keep using it and encounter other permissions and roles that are required, they will be added to the repository. Be aware that granular permissions for certain objects have also been added to a custom role called steampipe_custom_role. This is a way to keep the scope of permissions to a minimum.
Note that Steampipe won’t be able to see any deployed resources unless this role is given to the service account from every project that you would like it to access.
Compute Engine
This is a small virtual machine that is hosting Steampipe. It’s set up here as an e2-standard-2 machine since it doesn’t require too much horsepower. We have it using the service account previously created to limit its API access scopes to just what we need to run Steampipe, and we only give it an internal IP with no external internet access. The only thing that will connect to it is CloudSQL, and this can be done without going out to the public internet. To minimize security risks, we can go without a public IP. The subnet that is created in network.tf has Private Google Access enabled, which still lets Steampipe access the Google APIs.
We use Packer to build a GCE image to automate the installation of Steampipe before we run Terraform to deploy the infrastructure. The configuration scripts are fairly straightforward, having a blank Debian 10 image, installing Steampipe, and then installing the GCP plugin for it. Note that this is all done under the steampipe user, so when you SSH to run things, you first have to switch to that user.
Note that while Packer downloads and installs Steampipe and the GCP plugin, the Terraform resource for GCE starts it up in the startup script so that the Steampipe service is running when it’s instantiated.
Cloud SQL
Here we use Cloud SQL for Postgres as an intermediary between BigQuery and Steampipe. Since Steampipe can enter service mode and expose an endpoint that is Postgres compatible, we can use the foreign data wrapper functionality to import the schema from Steampipe. From here we can use BigQuery’s external tables functionality to query that schema through CloudSQL.
Time to configure and deploy!
Next, clone this Github repository. Make sure you have Terraform and Packer installed, and that the user you are authenticated as has the right permissions to deploy all the things. In a production environment you will want to have a service account created for both Terraform and Packer that is explicitly for deploying and building, but since this is a quick tutorial, we are just running this as “you.”
In the /packer path, create a file called variables.pkvars.hcl and set the variable for project_id with your actual project ID. This example shows what that looks like.
In the /terraform path, create a file called terraform.tfvars and set the variable for var_gcp_project_id with your actual project ID, as shown in this example.
Run a quick gcloud init, and then the runall.sh script. This simply runs the image build process for Packer, then runs the Terraform script to deploy all the assets. If all is well, all the artifacts and resources should be deployed. With that done, it’s now time to finish configuring the database connections.
Compute Engine
Everything for this resource should be configured. If you want to test that it works, from your command line run:
gcloud compute ssh \
  $(gcloud compute instances list \
    --filter="steampipe-svc-" \
    --format="value(NAME)") \
  --zone=us-central1-a \
  --command "sudo su - steampipe -c 'steampipe service status'"
It should look something like this:
brian_suk@cloudshell:~ (your-project)$ gcloud compute ssh $(gcloud compute instances list - filter="steampipe-svc-" - format="value(NAME)") - zone=us-central1-a - command "sudo su - steampipe -c 'steampipe service status'"
External IP address was not found; defaulting to using IAP tunneling.
Warning: Permanently added 'compute.number (ECDSA) to the list of known hosts.Steampipe service is running:  Host(s): localhost, 127.0.0.1, your_internal_ip
  Port: 9193
  Database: steampipe
  User: steampipe
  Password: some_pass_wordConnection string:  postgres://steampipe:some_pass_word@localhost:9193/steampipeManaging the Steampipe service:  # Get status of the service
  steampipe service status  # Restart the service
  steampipe service restart  # Stop the service
  steampipe service stopbrian_suk@cloudshell:~ (your-project)$
Be sure to note the internal IP address that it gave you, the port number, the password, and the Postgres connection string. These will all be useful. This output tells us that the Steampipe service is running, and has a Postgres endpoint that is available for connections.
If you want to test the Postgres connection (optional):
1 — Create a Compute Instance VM on the steampipe-network VPC and the steampipe-subnet-us-central1 subnet. This is the same subnet as the Steampipe server.
2 — SSH in.
3 — Install the Postgres client by running sudo apt-get install postgresql-client.
4 — Run the command psql with the connection string with the internal IP substituted, so it looks like psql postgres://steampipe:some_pass_word@your_internal_ip:9193/steampipe and it should connect.
5 — Run select * from gcp_compute_instance and it should return data on your environment.
Data should be returned, showing us that Steampipe can be treated like a Postgres database.
Cloud SQL
Now that we have the Steampipe service running, we want to connect Cloud SQL for Postgres to the Steampipe service. We will be using the postgres user, so be sure to change the password to something that you have taken note of. Connect to your database. A quick and easy way is to use gcloud in the Cloud Shell. Once connected, take the following steps:
1 — Set up the foreign data wrapper (FDW).
CREATE EXTENSION IF NOT EXISTS postgres_fdw;- To verify, run
SELECT * FROM pg_extension;and there should be a row forpostgres_fdwin the results.
2 — Create the connection object to the Steampipe service.
CREATE SERVER steampipe_server FOREIGN DATA WRAPPER postgres_fdw options (host ‘[your steampipe IP]’, port ‘9193’, dbname ‘steampipe’);- Be sure to use the internal IP address that the Steampipe service is listening on.
- Run
SELECT * FROM pg_foreign_server;if you want to verify.
3 — Create the user mapping that tells the postgres user what credentials to use on the remote server.
CREATE USER MAPPING FOR postgres SERVER steampipe_server OPTIONS (user ‘steampipe’, password ‘[steampipe service password]’);- Run
SELECT * FROM pg_user_mappings;to verify.
4 — Give the postgres user permission to use the foreign server connection.
GRANT USAGE ON FOREIGN SERVER steampipe_server TO postgres;
5 — Import the remote schema metadata into the Cloud SQL database.
IMPORT FOREIGN SCHEMA gcp LIMIT TO (gcp_compute_instance) FROM SERVER steampipe_server INTO public;- Note: As part of the tutorial, we are just limiting this to compute instance information. If you want to get everything, remove the
LIMIT TO (gcp_compute_instance)condition. - Run
SELECT * FROM gcp_compute_instance;to verify.
You now have a live connection between Cloud SQL and Steampipe!
BigQuery
The last step is to make the external data source connection from BigQuery to Cloud SQL. The documentation has all the information, but if you just want the command to run it, use the following:
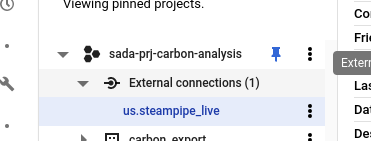
Now when you go into BigQuery you should see your new connection object within your project.
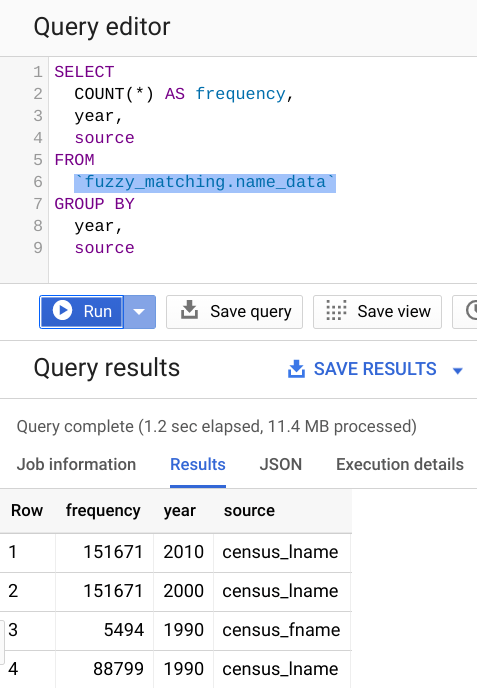
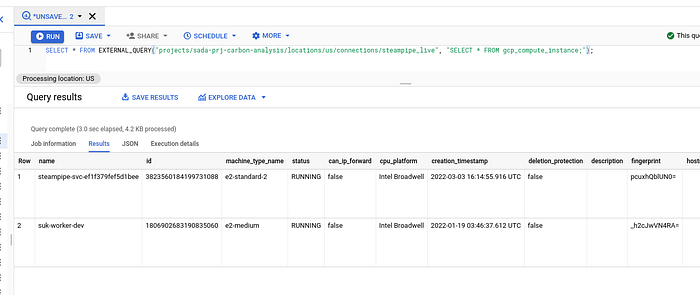
If you query the INFORMATION_SCHEMA, you can see all the imported Steampipe objects .

Now, running queries on those tables gets you the information on your Google Cloud (and any other services you have hooked up through Steampipe), right within BigQuery!
There you have it.You’re now able to use SELECT * across all your Cloud deployments directly within BigQuery. Happy querying!
About Brian Suk
Brian is an Associate CTO for Data Engineering and Analytics at SADA. He is helping to lead SADA’s data strategy and helping customers unlock the value of their data on Google Cloud. Previously holding roles in companies like Google Cloud, SAP, and Informatica, he focuses on the data space and is always looking to help customers innovate with the latest technologies. He also looks to focus on how cloud technologies can be leveraged in the sustainability space.
About SADA
At SADA, we climb every mountain, clear every hurdle, and turn the improbable into possible — over and over again. Simply put, we propel your organization forward. It’s not enough to migrate to the cloud, it’s what you do once you’re there. Accelerating application development. Advancing productivity and collaboration. Using your data as a competitive edge. When it comes to Google Cloud, we’re not an add-on, we’re a must-have, driving the business performance of our clients with its power. Beyond our expertise and experience, what sets us apart is our people. It’s the spirit that carried us from scrappy origins as one of the Google Cloud launch partners to an award-winning global partner year after year. With a client list that spans healthcare, media and entertainment, retail, manufacturing, public sector and digital natives — we simply get the job done, every step of the way. Visit SADA.com to learn more.
If you’re interested in becoming part of the SADA team, please visit our careers page.